Open topic with navigation
Boundary Conditions for Internal CFD Analyses
Internal boundary conditions can be defined in three ways:
- Surface temperatures can be defined for all zone surfaces including windows and other openings.
- Zone surface boundary conditions including supply diffusers, extract grilles, temperatures and heat fluxes can be added in the form of surface patches using a similar method to that used for adding windows and doors.
- Component blocks and component assemblies can be defined as temperature or heat flux boundaries or they can also have boundary condition patches added as described above for Zone surfaces.
In all cases the CFD boundary conditions can be edited on the CFD Model data tab.
Default Wall and Window Temperatures
All zone surfaces within a model have default wall and window boundary temperatures. These boundary temperatures are inherited from the building level down to the zone surface level and may be set at any intermediate level. This mechanism provides a convenient method for defining wall and window temperature boundary conditions throughout a building model in the absence of imported EnergyPlus boundary data.
Default inside and outside wall and window boundary temperatures can be accessed under the CFD Boundary header on the CFD tab:
Zone and Component Block Surface Boundaries
Supply diffusers, extract grilles, temperature and heat flux patches can be added to zone and component block surfaces using the Add CFD boundary tool.
To add a surface boundary, move down to the surface on which you want to locate the boundary, either by selecting it from the model navigator or by navigating to it in the Edit screen. At the surface level, you can then select the Add CFD boundary tool from the toolbar:
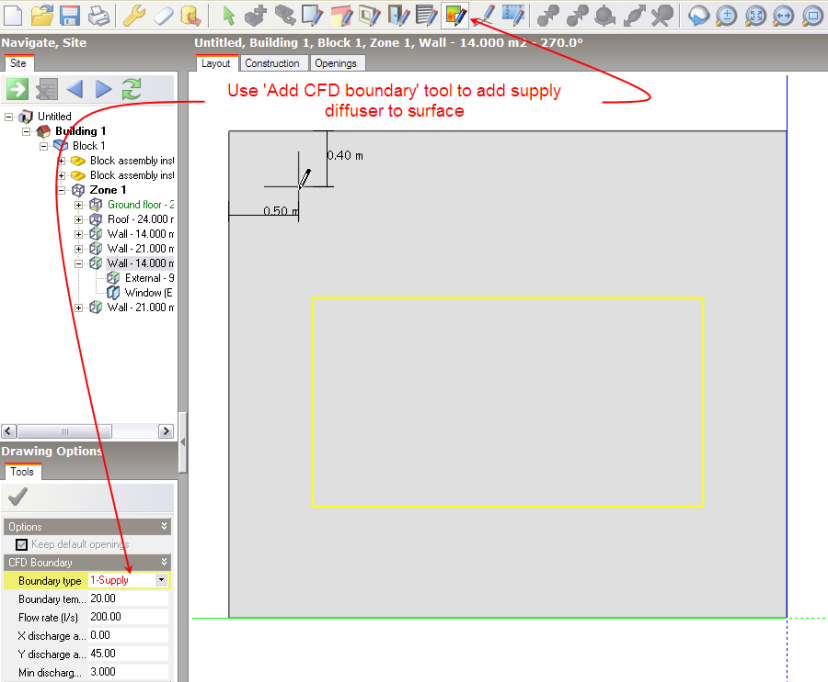
You can draw a CFD boundary on to the surface in exactly the same way that you would draw a window. Refer to the Draw Window section for details of drawing windows.
After selecting the Add CFD boundary tool, the boundary settings are displayed on the Drawing options data panel. You can select the required boundary type from the Boundary type drop list. The following boundary types are available for surfaces of all orientations:
- 1–Supply (general purpose HVAC supply diffuser)
- 4–Extract (HVAC extract grille)
- 5–Temperature (surface temperature patch)
- 6–Flux (surface heat flux patch)
The following additional boundary types for multi-directional diffusers will appear for ceiling and other downward-facing surfaces only:
- 2–Four-way (four-way supply diffuser)
- 3–Two-way (two-way supply diffuser)
Various settings are available depending on the boundary type:
1-Supply:
- Boundary temperature - the temperature of the air entering the space.
- Flow rate - the supply volume flow rate.
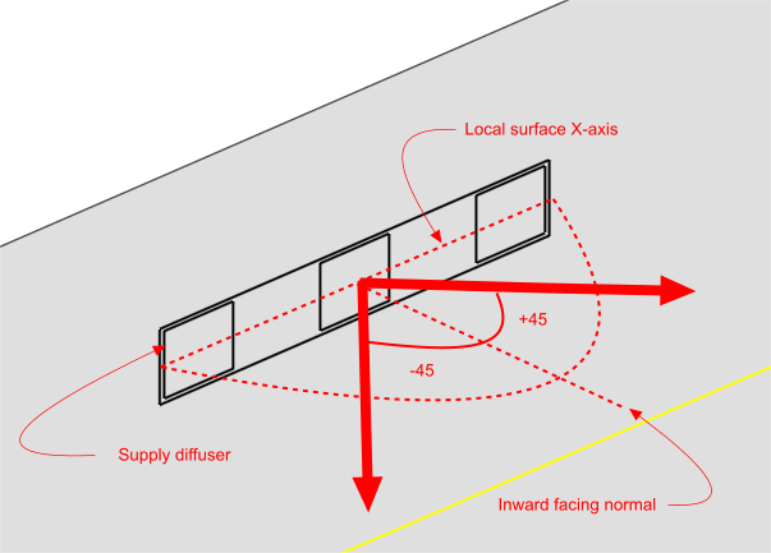
- X-discharge angle (°) - the discharge angle between the local surface X-axis and an inward facing normal to the surface. At the surface level, taking a normal view from the inside of the zone to the surface, the X-axis discharge angle is positive between the normal and the positive X-axis (i.e. the axis pointing towards the right) and negative between the normal and the negative X-axis (i.e. the axis pointing towards the left). For example to define a discharge angle of 45° pointing towards the left of the centre of a diffuser, looking at it from the inside of the zone, you would enter –45. On the other hand, to define a discharge angle of 45° pointing towards the right of the centre, you would enter 45:
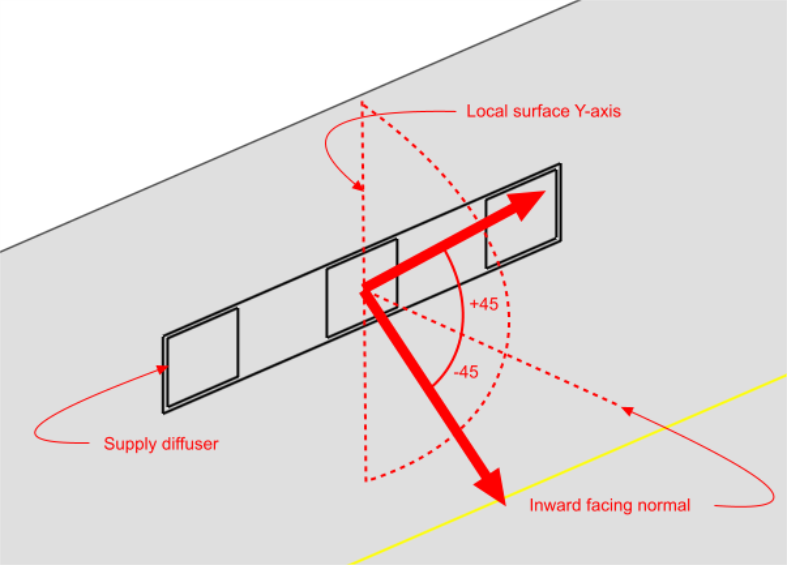
- Y-discharge angle (°) - the discharge angle between the local surface Y-axis and an inward facing normal to the surface. At the surface level, taking a normal view from the inside of the zone to the surface, the Y-axis discharge angle is positive between the normal and the positive Y-axis (i.e. the axis pointing upwards) and negative between the normal and the negative Y-axis (i.e. the axis pointing downwards). For example to define a discharge angle of 45° pointing downwards from the centre of a diffuser, looking at it from the inside of the zone, you would enter –45. On the other hand, to define a discharge angle of 45°, pointing upwards from the centre, you would enter 45:
- Minimum discharge velocity - the minimum required velocity at the face of the diffuser. Supply diffusers are created using a number of elements, the areas of which are determined by combining the specified volume flow rate together with the minimum discharge velocity. The maximum linear dimension of each component element is currently 'hard-set' at 0.2m.
2–Four-way
- Boundary temperature - temperature of the air entering the space.
- Flow rate - the supply flow rate.
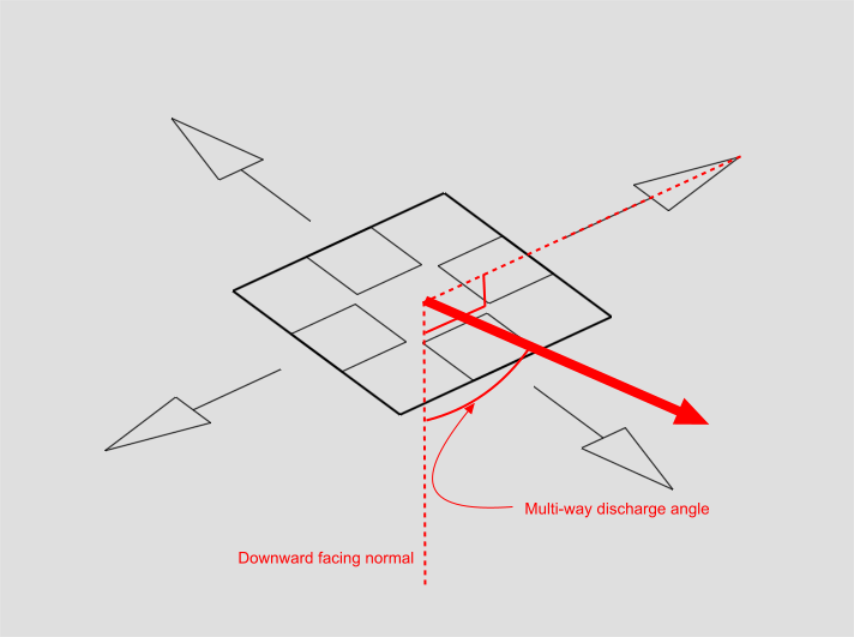
- Multi-way diffuser discharge angle (°) - the discharge angle is the angle between the downward pointing normal and the diffuser jet.
- Minimum discharge velocity - the minimum required velocity at the face of the diffuser. Four-way diffusers are created using four separate elements, one located at each edge of the diffuser, the area of each being determined by combining the specified volume flow rate together with the minimum discharge velocity.
3–Two-way
- Boundary temperature - the temperature of the air entering the space.
- Flow rate - enter the supply flow rate.
- Multi-way diffuser discharge angle (°) - the angle between the downward pointing normal and the diffuser jet (see illustration in ‘Four-way’ section).
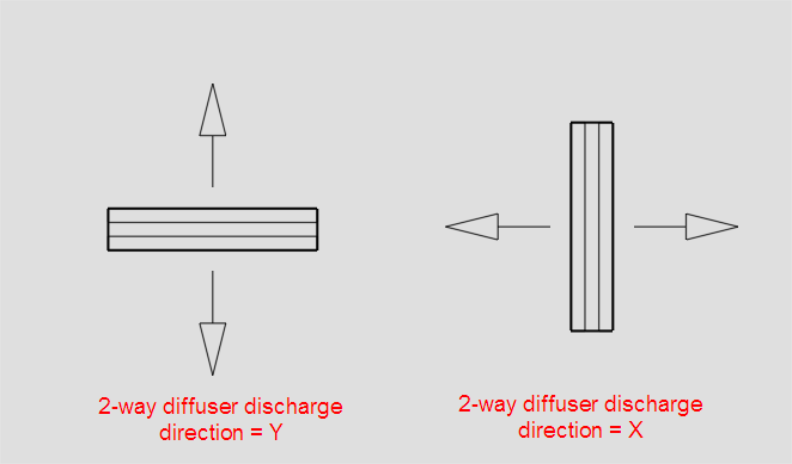
- 2-way diffuser discharge direction - the local surface axis along which the diffuser is to discharge.
- Minimum discharge velocity - the minimum required velocity at the face of the diffuser. Two-way diffusers are created using two separate elements, one on either side of the diffuser along the discharge axis, the area of each being determined by combining the specified volume flow rate together with the minimum discharge velocity.
4–Extract
- Flow rate - the extract flow rate.
5–Temperature
- Boundary temperature - temperature for the patch.
6– Flux
- Heat flux - heat flux for the patch.


